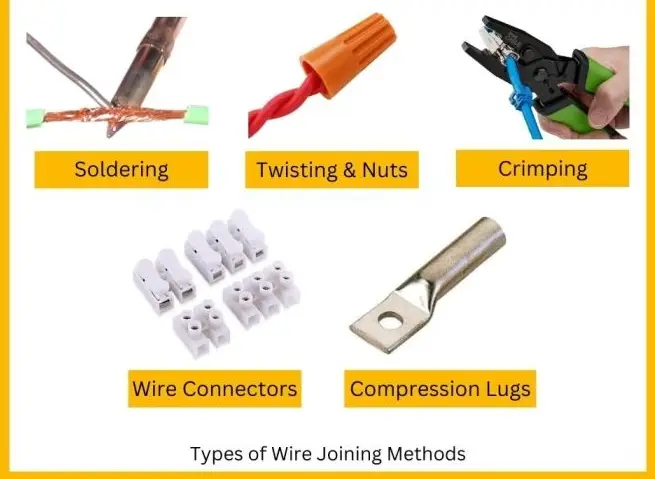
Direct Answer: The most common methods used to attach connectors to wires are crimping, soldering, screw terminals, push-in connections, and wire nuts. Each method serves different applications based on current requirements, environmental conditions, and permanence needs. Crimping is the most widely used method for professional electrical connections due to its reliability and code compliance.
Understanding proper wire connector attachment is essential for electrical safety, system reliability, and code compliance. Whether you’re working on automotive wiring, home electrical projects, or industrial applications, choosing the right attachment method prevents failures, fires, and costly repairs.
Key Definitions: Wire Connector Attachment Methods

Crimping: A mechanical connection method that uses specialized tools to compress a metal connector around stripped wire ends, creating a gas-tight, permanent connection through cold welding.
Soldering: A metallurgical joining process that uses molten metal (solder) to create an electrical and mechanical bond between the connector and wire.
Screw Terminals: Mechanical connectors that use threaded screws to clamp wire ends securely within terminal blocks or devices.
Push-In Connections: Spring-loaded connectors that grip wires when inserted, allowing tool-free connection and disconnection.
Wire Nuts: Threaded plastic caps with internal metal springs that twist onto multiple wire ends to create secure connections in junction boxes.
Comprehensive Comparison: Wire Connector Attachment Methods
| Method | Strength | Durability | Ease of Use | Code Compliance | Best Applications |
|---|---|---|---|---|---|
| Crimping | Excellent | 20+ years | Moderate (requires tools) | Full NEC/UL approval | Automotive, industrial, permanent connections |
| Soldering | Excellent | 15-25 years | Difficult (requires skill) | Limited approval* | Electronics, audio, low-vibration environments |
| Screw Terminals | Good | 10-15 years | Easy | Full approval | Panel connections, junction boxes, field wiring |
| Push-In Connections | Fair-Good | 5-10 years | Very Easy | Full approval | Residential, temporary, frequent changes |
| Wire Nuts | Good | 10-20 years | Easy | Full approval | Junction boxes, branch circuits, residential |
*Soldering alone typically requires mechanical support for NEC compliance
Primary Attachment Tools and Equipment
Crimping Tools and Connectors
Professional Crimping Tools:
- Ratcheting crimpers: Ensure complete compression cycles
- Hydraulic crimpers: For large gauge wires and high-force applications
- Insulation displacement tools: For quick-connect terminals
- Die sets: Specific to connector types and wire gauges
Common Crimp Connectors:
- Ring terminals (permanent attachment to studs/screws)
- Spade terminals (removable connections)
- Butt connectors (joining two wire ends)
- Pin terminals (multi-pin connector assemblies)
Soldering Equipment
Essential Soldering Tools:
- Temperature-controlled soldering irons: 25-40 watts for electronics, 60-100 watts for heavy-duty
- Lead-free solder: 60/40 or 63/37 tin/lead ratios
- Flux paste: Ensures clean, strong bonds
- Heat shrink tubing: Insulates and protects soldered joints
Mechanical Connection Hardware
Screw Terminal Components:
- Terminal blocks: Multi-point connection systems
- Barrier strips: Insulated screw terminals
- Ground bars: Equipment grounding connections
- Compression lugs: High-current applications
Step-By-Step Wire Connector Attachment Processes
How to Crimp Connectors to Wires
- Select proper connector size based on wire gauge and application requirements
- Strip wire insulation to manufacturer’s specified length (typically 1/4″ to 3/8″)
- Insert wire fully into connector barrel until insulation meets the connector
- Position crimping tool over the connector at the designated crimp point
- Apply steady pressure until the ratcheting tool completes its cycle
- Verify connection by gently tugging the wire – it should not pull out
- Inspect crimp quality – properly crimped connectors show uniform compression
🔧 Expert Tip: Always use the correct die size for your connector. Undersized dies create weak connections, while oversized dies may not compress properly.
Professional Soldering Technique
- Clean all surfaces with fine sandpaper or wire brush
- Pre-tin the wire by applying a thin layer of solder to stripped copper
- Heat the connector with the soldering iron for 2-3 seconds
- Apply solder to the connection point, not the iron tip
- Remove solder first, then the iron, allowing the joint to cool motionless
- Inspect the joint – it should appear shiny and smooth, not dull or granular
- Apply heat shrink tubing for insulation and strain relief
⚠️ Safety Warning: Work in well-ventilated areas when soldering. Lead-based solders produce toxic fumes. Always wash hands after handling solder materials.
Applications and Use Cases by Industry

Automotive Applications
- Battery terminals: Compression lugs with anti-corrosion treatment
- Engine bay connections: Heat-resistant crimp connectors with sealed housings
- Interior wiring: Push-in connectors for easy service access
- Aftermarket installations: Ring terminals for secure chassis grounds
Residential Electrical
- Circuit panels: Screw terminals for breaker connections
- Junction boxes: Wire nuts for branch circuit splicing
- Outlet and switch connections: Screw terminals or push-in options
- Low-voltage systems: Crimp connectors for security and communication wiring
Industrial and Commercial
- Motor control centers: Compression lugs for high-current connections
- Control panels: Terminal blocks for organized field wiring
- Instrumentation: Soldered connections for signal integrity
- Power distribution: Bolted compression connections for safety
Selection Criteria: Choosing the Right Attachment Method
Current Carrying Requirements
- Low current (0-5 amps): Any method acceptable
- Medium current (5-20 amps): Crimped or screw terminals preferred
- High current (20+ amps): Compression lugs or bolted connections required
Environmental Considerations
- Moisture exposure: Sealed crimp connectors with heat shrink
- Vibration: Crimped connections outperform screw terminals
- Temperature extremes: High-temperature solder or ceramic terminal blocks
- Corrosive environments: Stainless steel or plated connectors
Installation Accessibility
- One-time connections: Soldering or crimping for permanence
- Field serviceable: Screw terminals for easy maintenance
- Frequent changes: Push-in connectors for flexibility
- Space constraints: Low-profile crimp terminals
Code Compliance and Safety Standards
National Electrical Code (NEC) Requirements
- Section 110.14: Connection integrity and ampacity requirements
- Section 300.15: Junction box and splicing regulations
- Section 400: Flexible cord and cable connections
- Section 690: Solar PV system connection requirements
UL Listing Requirements
- All connectors must be UL Listed for their intended application
- Wire nuts require UL 486C certification
- Crimp connectors need UL 486A or 486B approval
- Soldered connections typically require mechanical support
⚠️ Safety Warning: Always follow local electrical codes and manufacturer specifications. Improper connections cause electrical fires and equipment damage. When in doubt, consult a licensed electrician.
Troubleshooting Common Connection Problems
Crimp Connection Issues
Problem: Wire pulls out of connector
Solution: Use correct crimping tool and verify proper strip length
Problem: Overheated crimp connection
Solution: Check for proper connector sizing and clean contact surfaces
Soldering Problems
Problem: Cold solder joints (dull, grainy appearance)
Solution: Increase iron temperature and ensure proper surface preparation
Problem: Intermittent connection
Solution: Remove old solder, clean surfaces, and re-solder with fresh materials
Screw Terminal Issues
Problem: Loose connection over time
Solution: Use proper torque specification and thread-locking compound
Problem: Damaged wire strands
Solution: Re-strip wire and use ferrule terminals for multi-strand wire
Professional Installation Tips
🔧 Expert Tip: For marine applications, use tinned copper wire and marine-grade heat shrink with adhesive lining to prevent corrosion.
🔧 Expert Tip: When crimping aluminum wire, use only connectors specifically rated for aluminum connections and apply anti-oxidant compound.
🔧 Expert Tip: Temperature cycling can loosen screw terminals. Re-torque connections annually in high-temperature applications.
Quick Reference: Wire Gauge and Connector Sizing
| Wire Gauge (AWG) | Crimp Connector Size | Screw Terminal Capacity | Max Current (Copper) |
|---|---|---|---|
| 22-18 | 22-18 gauge connectors | #6 screw | 7-16 amps |
| 16-14 | 16-14 gauge connectors | #8 screw | 18-25 amps |
| 12-10 | 12-10 gauge connectors | #10 screw | 30-40 amps |
| 8-6 | 8-6 gauge connectors | 1/4″ screw | 50-75 amps |
| 4-2 | 4-2 gauge connectors | 5/16″ screw | 85-115 amps |
Frequently Asked Questions
Can I use wire nuts on solid and stranded wire together?
Yes, but ensure the wire nut is sized for the largest wire gauge and make extra twists with stranded wire for secure connection.
What’s the difference between insulated and non-insulated crimp connectors?
Insulated connectors include plastic sleeves for electrical protection and are color-coded by wire gauge. Non-insulated connectors require separate heat shrink tubing.
How tight should screw terminals be torqued?
Follow manufacturer specifications, typically 10-12 in-lbs for residential devices and up to 35 ft-lbs for large industrial terminals.
Can soldered connections be used in junction boxes?
NEC allows soldered splices with mechanical support (like wire nuts) in junction boxes, but pure solder joints without mechanical support are not code-compliant.
What causes crimp connections to fail over time?
Common causes include undersized connectors, improper crimping tools, environmental corrosion, thermal cycling, and exceeding current ratings.
Are push-in connectors reliable for permanent installations?
Push-in connectors are code-compliant but generally considered less reliable than screw terminals or crimped connections for permanent installations.
How do I know if a connector is properly crimped?
A properly crimped connector shows uniform compression, the wire cannot be pulled out with reasonable force, and there are no visible gaps or cracks in the crimp barrel.
What’s the best connection method for outdoor applications?
Sealed crimp connectors with heat shrink tubing or waterproof wire nuts specifically rated for wet locations provide the best protection against moisture.
Conclusion: Choosing the Right Wire Connection Method
Selecting the proper method to attach connectors to wires depends on your specific application requirements, including current capacity, environmental conditions, code compliance needs, and maintenance accessibility. Crimping remains the gold standard for professional installations due to its reliability, code compliance, and long-term durability.
For permanent installations requiring maximum reliability, use properly sized crimp connectors with professional-grade tools. For residential applications where accessibility matters, screw terminals offer excellent performance with easy maintenance. Always prioritize safety by following manufacturer specifications, local electrical codes, and professional installation practices.
When in doubt about connection methods or code requirements, consult a licensed electrician to ensure safe, compliant, and reliable electrical connections that protect both people and property.

