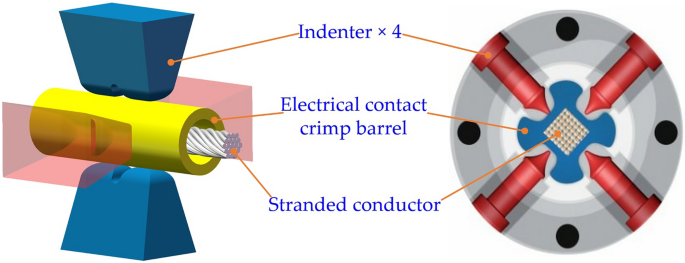
Tensile testing and metallographic analysis of cold pressed terminals are critical quality control methods that evaluate mechanical strength, material integrity, and manufacturing quality. These complementary testing approaches help manufacturers ensure reliable electrical connections by measuring tensile strength (typically 15-50 lbf for standard terminals) and examining the microscopic structure for defects, grain boundaries, and material flow patterns.
Understanding these testing methods is essential for quality engineers, manufacturers, and procurement specialists who need to validate terminal performance, meet industry standards like UL 486A-B and IEC 60947-7-1, and prevent costly field failures in electrical applications.
What Are Tensile Tests and Metallographic Analysis for Cold Pressed Terminals?
Tensile Testing Definition

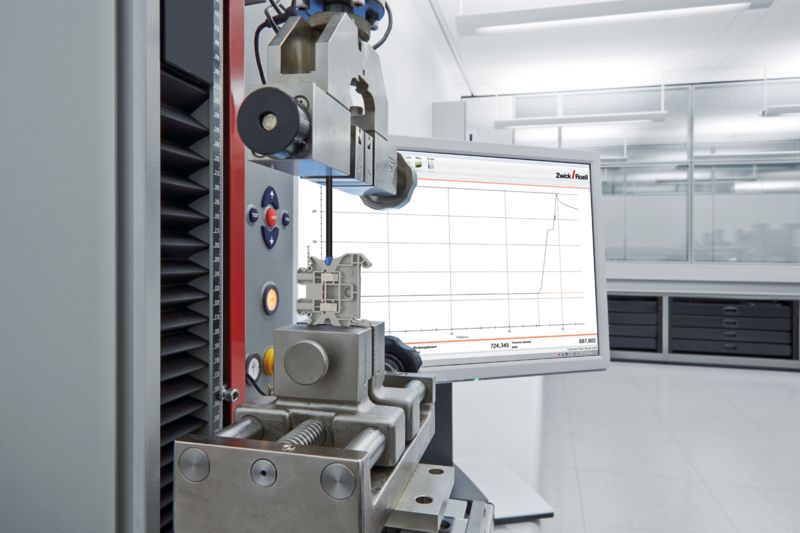
Tensile testing measures the maximum force a cold pressed terminal can withstand before failure, evaluating the mechanical bond strength between the conductor and terminal barrel. This destructive test applies gradually increasing tensile force until the connection separates, providing quantitative data on connection reliability.
Metallographic Analysis Definition

Metallographic analysis involves microscopic examination of polished and etched terminal cross-sections to evaluate material structure, compression patterns, and potential defects. This non-destructive preparation method reveals grain flow, void formation, and the quality of metal-to-metal contact areas.
Key Differences Between Tensile Testing and Metallographic Analysis
| Aspect | Tensile Testing | Metallographic Analysis |
|---|---|---|
| Test Type | Destructive mechanical test | Non-destructive structural examination |
| Primary Measurement | Pull force (lbf or N) | Visual structure assessment |
| Data Output | Quantitative strength values | Qualitative structural images |
| Sample Preparation | Minimal – direct pull test | Extensive – mounting, polishing, etching |
| Equipment Required | Tensile testing machine | Metallurgical microscope, sample prep tools |
| Time to Results | 2-5 minutes per sample | 2-4 hours per sample |
| Cost per Test | $15-30 | $75-150 |
| Standards Compliance | UL 486A-B, IEC 60947-7-1 | ASTM E3-11, ISO 17639 |
Applications and Use Cases
Quality Control Applications
Production Line Testing: Tensile tests validate every batch of cold pressed terminals, ensuring consistent mechanical performance. Manufacturers typically test 5-10 samples per production lot to maintain statistical process control.
Incoming Inspection: Metallographic analysis verifies supplier quality by examining terminal structure before assembly into critical applications like automotive wiring harnesses or aerospace electrical systems.
Failure Analysis: When field failures occur, both testing methods work together to identify root causes – tensile tests quantify reduced strength while metallographic analysis reveals structural defects.
Industry-Specific Requirements
Automotive Applications: Ford WSS-M12P4-A and GM GMW3191 specifications require minimum tensile strengths of 25-40 lbf depending on wire gauge, with metallographic verification of proper compression ratios.
Aerospace Standards: AS50881 and IPC-A-620 mandate both tensile testing and metallographic analysis for Class 3 applications, requiring pull strengths exceeding 80% of conductor breaking strength.
Medical Device Manufacturing: ISO 13485 quality systems often specify metallographic analysis to prevent particle contamination and ensure biocompatible material integrity.
Purpose and Benefits of Combined Testing
Why Tensile Testing Matters
You use tensile testing to validate that cold pressed terminals meet minimum strength requirements and won’t fail under operational stresses. This testing prevents:
- Intermittent connections due to inadequate compression
- Conductor pullout under vibration or thermal cycling
- Contact resistance increases from loose mechanical bonds
- Safety hazards in critical electrical systems
Why Metallographic Analysis Is Essential
You need metallographic analysis to understand the internal quality of cold pressed connections that tensile testing cannot reveal:
- Compression uniformity across the terminal barrel
- Void detection that reduces effective contact area
- Material flow patterns indicating proper forming
- Contamination identification affecting long-term reliability
Expert Tip: Combine both methods for complete quality assessment. Tensile testing provides pass/fail criteria while metallographic analysis explains the “why” behind test results and predicts long-term performance.
Tensile Testing Implementation Guide
Equipment and Setup Requirements
Essential Equipment:
- Universal testing machine (100-1000 lbf capacity)
- Terminal gripping fixtures (avoid stress concentrations)
- Force measurement accuracy: ±1% of reading
- Test speed control: 0.2-2.0 inches/minute
Sample Preparation:
- Select representative samples from each production lot
- Ensure terminals are properly seated on conductors
- Mark test direction parallel to conductor axis
- Document wire gauge, terminal type, and lot numbers
Step-by-Step Testing Procedure
Step 1: Sample Mounting
- Secure terminal in lower grip without damaging barrel
- Clamp conductor in upper grip at least 2 inches from terminal
- Verify alignment to prevent bending moments during test
Step 2: Test Execution
- Set crosshead speed per applicable standard (typically 0.5 in/min)
- Apply preload of 5-10% maximum expected force
- Begin test and record force continuously until failure
- Note failure mode (conductor break, terminal separation, or grip slippage)
Step 3: Data Analysis
- Record maximum tensile force before failure
- Calculate percentage of conductor breaking strength
- Compare to specification requirements
- Document any unusual failure patterns
Acceptance Criteria and Standards
| Wire Gauge (AWG) | Minimum Tensile Strength (lbf) | Conductor Break Required |
|---|---|---|
| 22 | 15 | >80% cases |
| 20 | 20 | >80% cases |
| 18 | 30 | >80% cases |
| 16 | 40 | >80% cases |
| 14 | 50 | >80% cases |
| 12 | 65 | >80% cases |
Safety Warning: Always wear safety glasses during tensile testing. Conductor failure can cause rapid spring-back and projectile hazards.
Metallographic Analysis Implementation Guide
Sample Preparation Process
Step 1: Sectioning
- Cut terminal perpendicular to compression axis using precision saw
- Maintain cooling during cutting to prevent microstructural changes
- Select cross-section showing maximum compression area
Step 2: Mounting
- Mount samples in phenolic or epoxy resin
- Ensure proper orientation for microscopic examination
- Use vacuum impregnation to fill voids with mounting media
Step 3: Grinding and Polishing
- Progress through grits: 240, 400, 600, 800, 1200
- Final polish with 0.3μm and 0.05μm alumina suspension
- Clean between each step to prevent contamination
Step 4: Etching
- Apply appropriate etchant based on terminal material:
- Copper terminals: 10% nitric acid solution
- Aluminum terminals: Keller’s reagent
- Steel terminals: 2% nital solution
- Control etching time (10-30 seconds typical)
Microscopic Examination Criteria
Structural Assessment Points:
- Compression Ratio: Measure original vs. compressed barrel dimensions
- Material Flow: Evaluate smooth, continuous grain flow patterns
- Void Content: Count and measure internal voids >0.001 inch
- Interface Quality: Assess conductor-to-terminal contact intimacy
Defect Identification:
- Cold shuts: Incomplete material flow creating internal cracks
- Inclusions: Foreign particles disrupting material continuity
- Overcompression: Excessive material flow causing conductor damage
- Undercompression: Insufficient deformation leaving gaps
Documentation and Reporting Standards
Required Documentation:
- Sample identification and traceability
- Magnification levels (typically 50X-500X)
- Measurement data with calibrated scales
- Defect location and severity ratings
- Compliance assessment against specifications
Selection Guide: Choosing the Right Testing Approach
When to Use Tensile Testing Only
You should prioritize tensile testing when:
- High-volume production requires rapid quality feedback
- Cost constraints limit extensive analysis budgets
- Established processes with proven metallographic quality
- Pass/fail decisions don’t require failure mode analysis
When to Use Metallographic Analysis Only
You should choose metallographic analysis when:
- Process development requires structural understanding
- New materials need baseline characterization
- Customer specifications mandate structural evaluation
- Research applications study compression mechanics
When to Use Combined Testing
You need both methods when:
- Critical applications demand comprehensive quality assurance
- Failure investigation requires root cause analysis
- Process optimization seeks performance-structure relationships
- Regulatory compliance mandates dual verification methods
Expert Tip: For new product qualification, always start with combined testing to establish baseline performance and structural characteristics. Once processes are validated, you can often reduce to tensile testing for routine quality control.
Troubleshooting Common Issues
Tensile Testing Problems
Issue: Inconsistent Results
- Cause: Improper gripping or sample alignment
- Solution: Use dedicated terminal grips and verify perpendicular loading
Issue: Premature Grip Failure
- Cause: Excessive clamping force damaging samples
- Solution: Adjust grip pressure and use protective sleeves
Issue: Low Strength Values
- Cause: Undercompressed terminals or contaminated interfaces
- Solution: Verify compression tooling and conductor surface preparation
Metallographic Analysis Problems
Issue: Poor Sample Quality
- Cause: Inadequate polishing or contamination
- Solution: Extend polishing steps and clean between stages
Issue: Unclear Structural Details
- Cause: Incorrect etching time or concentration
- Solution: Optimize etchant chemistry and timing for specific materials
Issue: Measurement Inaccuracy
- Cause: Uncalibrated microscope or improper magnification
- Solution: Perform regular calibration with certified standards
Professional Standards and Compliance
Industry Standards Reference
UL 486A-B (Wire Connectors)
- Minimum tensile strength requirements
- Sample size and testing frequency
- Acceptance criteria for different applications
IPC-A-620 (Cable and Wire Harness Assemblies)
- Class 1, 2, and 3 requirements
- Metallographic acceptance criteria
- Documentation requirements
ASTM B539 (Measuring Resistance of Electrical Connections)
- Combined electrical and mechanical testing
- Correlation between structure and performance
- Long-term reliability assessment methods
Certification and Training Requirements
Operator Qualifications:
- IPC certification for Class 3 applications
- Metallographic society training for structural analysis
- Equipment manufacturer certification for testing machines
Quality System Integration:
- ISO 9001 process documentation requirements
- Statistical process control implementation
- Traceability and record retention protocols
Expert Tips for Optimal Results
Professional Recommendation: Establish control charts for both tensile strength and metallographic measurements. Track trends over time to identify process drift before it affects product quality.
Cost Optimization: Develop sampling plans based on risk assessment. Critical applications may require 100% tensile testing with periodic metallographic verification, while standard products can use statistical sampling.
Process Improvement: Use metallographic feedback to optimize compression tooling design. Proper die geometry eliminates many structural defects that reduce tensile performance.
Quick Reference Testing Checklist
Pre-Test Verification
- ☐ Verify sample traceability and documentation
- ☐ Confirm equipment calibration within validity period
- ☐ Check environmental conditions (temperature, humidity)
- ☐ Prepare required safety equipment and procedures
During Testing
- ☐ Follow standard operating procedures exactly
- ☐ Document any deviations or unusual observations
- ☐ Maintain proper sample handling and storage
- ☐ Record all measurements with appropriate precision
Post-Test Activities
- ☐ Calculate results using approved formulas
- ☐ Compare to specification limits and historical data
- ☐ Generate reports with required content and format
- ☐ Initiate corrective actions for non-conforming results
Frequently Asked Questions
What is the typical cost difference between tensile testing and metallographic analysis?
Tensile testing costs approximately $15-30 per sample including labor and equipment time, while metallographic analysis ranges from $75-150 per sample due to extensive preparation requirements. The investment in metallographic analysis pays off through deeper understanding of failure mechanisms and process optimization opportunities.
How often should you perform both tests during production?
For established processes, perform tensile testing on 5-10 samples per production lot with metallographic analysis on 1-2 samples per shift or when tensile results show unusual trends. Critical applications may require more frequent testing based on risk assessment and customer requirements.
Can tensile testing replace metallographic analysis for routine quality control?
Tensile testing can serve as primary quality control once metallographic analysis has validated the process and established acceptance criteria. However, periodic metallographic verification (monthly or quarterly) remains essential to detect gradual process changes that don’t immediately affect tensile strength.
What sample size is required for statistically valid results?
Minimum sample sizes depend on process capability and acceptance criteria. For tensile testing, 5-10 samples per lot provide adequate statistical power for most applications. Metallographic analysis typically requires 2-3 samples per evaluation period due to higher cost and preparation time.
How do environmental conditions affect test results?
Temperature and humidity can significantly impact both tests. Conduct testing at controlled conditions (68-77°F, 45-55% RH) and allow samples to equilibrate for at least 2 hours. Document environmental conditions with test results for traceability.
What are the most common failure modes in cold pressed terminals?
Tensile testing typically reveals three failure modes: conductor break (preferred, indicates strong crimp), conductor pullout (indicates insufficient compression), and terminal fracture (indicates material or design issues). Metallographic analysis helps distinguish between these modes and identify root causes.
How do you correlate tensile strength with long-term reliability?
Establish baseline tensile strengths for new products, then track performance through accelerated aging tests and field data. Terminals maintaining >90% of initial tensile strength after thermal cycling typically demonstrate excellent long-term reliability. Metallographic analysis reveals structural changes that predict performance degradation before tensile strength declines.
Ready to implement comprehensive quality control for your cold pressed terminals? Contact certified testing laboratories for equipment recommendations and training programs, or consult with materials engineers to develop optimized testing protocols specific to your applications and industry requirements.

