
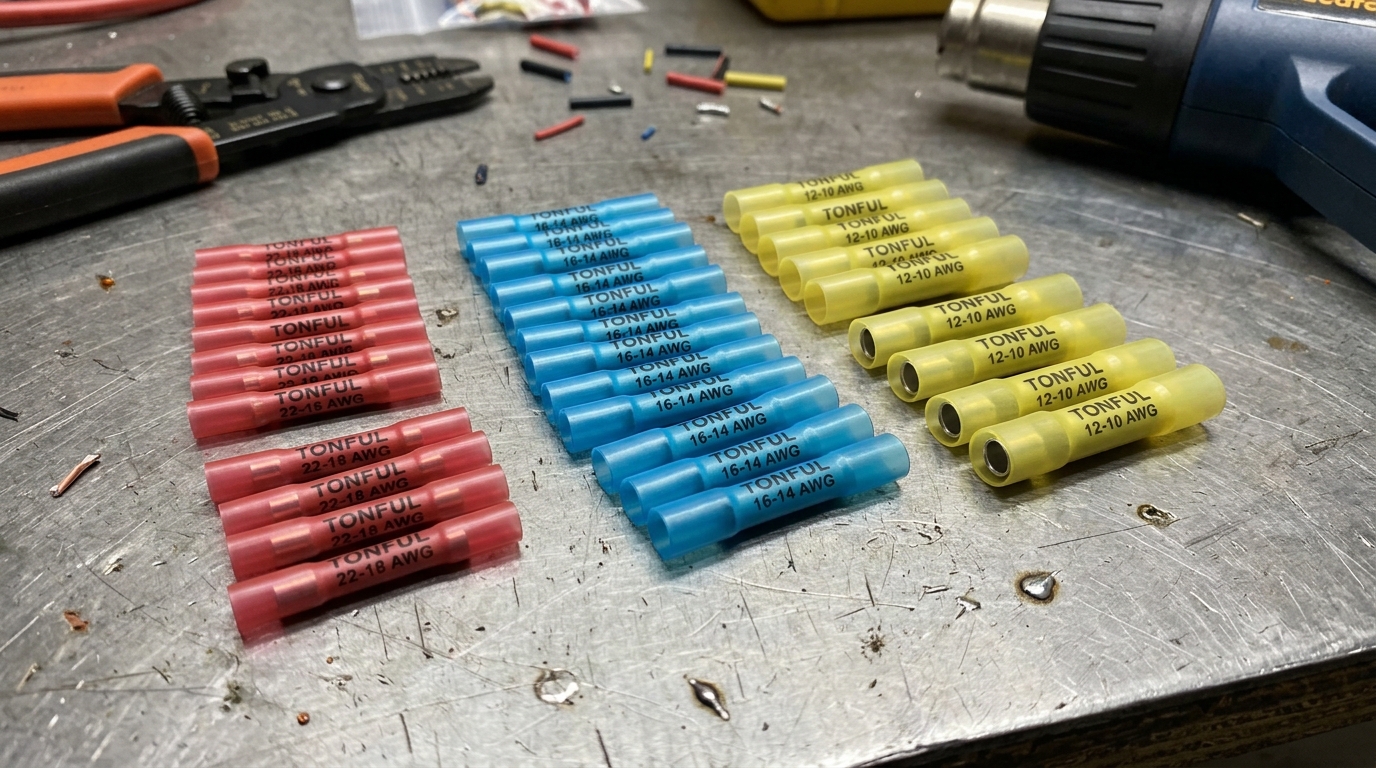
When a circuit calls for joining a 10 AWG feeder to a 14 AWG branch, or splicing a 16 AWG appliance lead onto a 12 AWG harness run, a standard butt splice leaves you with a loose, under-crimped barrel on the smaller wire — and a connection that will overheat and fail under load. The engineered answer is a step-down butt connector: a purpose-built splice whose tin-plated copper barrel narrows from one end to the other so each conductor seats against a properly sized crimp zone. This guide walks through how TONFUL step-down butt connectors join two dissimilar sized wires correctly, safely, and to code, whether you are working on an automotive harness, a marine wiring system, or an industrial control panel.
What Is a Step-Down Butt Connector?
A step-down butt connector — also called a reducing butt splice — is a cylindrical crimp terminal with a single copper barrel that has two different internal diameters. The larger opening accepts a heavier-gauge conductor; the smaller opening accepts a lighter-gauge conductor. A colored band or stripe molded into the insulation on each end identifies which AWG range goes in which side, following the same red / blue / yellow convention used across the insulated terminal industry. If you need a refresher on that system, our crimp terminal color code chart breaks down every size and color.
The barrel itself is tin-plated copper (Alloy 110, annealed for ductility), surrounded by either nylon insulation on economy versions or adhesive-lined heat shrink on sealed versions. The heat shrink terminal variant is the one most professional electricians and marine technicians reach for: once heated, the sleeve collapses around the wire and a hot-melt adhesive flows to form a waterproof, vibration-resistant seal rated to IP67 and above. For a broader look at where these fit among other splice types, see our complete guide to types of wire connectors.

Why You Can Not Use a Standard Butt Splice for Dissimilar Wires
The temptation is to grab the next size up and stuff both wires into a single-barrel butt splice. That works badly, and here is why. A standard butt connector has a uniform internal diameter sized for one AWG range. When you insert a 14 AWG conductor into a barrel designed for 10 AWG, the crimp die cannot compress the barrel tightly enough around the smaller strands. The result is high contact resistance, a weak mechanical grip, and a joint that runs hot under load — the three conditions that, together, cause the kind of thermal failure we document in why your crimp failed: terminal pull-off causes.
A step-down connector solves this by giving each wire its own correctly sized crimp zone within a single continuous barrel. The larger end crimps down on the heavier gauge; the smaller end crimps down on the lighter gauge; the two are joined internally by a solid copper bridge that maintains full ampacity across the transition. No soldering, no wire folding, no guesswork.
TONFUL Step-Down Butt Connector Specifications
| Size Color | Large End (AWG) | Small End (AWG) | Typical Application | Insulation Type | Voltage Rating | Seal Rating |
|---|---|---|---|---|---|---|
| Red | 22–18 | 24–22 | Signal / sensor leads, LED wiring | Adhesive-lined heat shrink | 600 V | IP67 |
| Blue | 16–14 | 22–18 | Automotive lighting, appliance branches | Adhesive-lined heat shrink | 600 V | IP67 |
| Yellow | 12–10 | 16–14 | Power feeds, harness main runs | Adhesive-lined heat shrink | 600 V | IP67 |
| Yellow (HD) | 10–8 | 12–10 | Battery cables, solar arrays | Dual-wall heat shrink + bare copper | 600 V | IP68 |
| Red (Nylon) | 22–18 | 24–22 | Dry interior, low-voltage | Nylon insulation | 300 V | — |
All TONFUL sealed variants use 3:1 shrink-ratio, adhesive-lined polyolefin tubing and tin-plated annealed copper barrels. For help matching metric cable cross-sections to these AWG ranges, refer to our AWG to metric conversion chart.

Tools and Materials Required
Before starting, gather the right tooling. A proper crimp is only as good as the die that forms it, and using the wrong jaw profile is the single most common cause of failed terminations — a topic we cover in understanding crimp dies: JA, JC, HX selection guide.
- Ratcheting crimping tool with color-coded dies matching the connector (red / blue / yellow). A ratchet mechanism prevents under-crimping by releasing only at full pressure. See our electrical tools manufacturer page for spec sheets.
- Wire stripper with calibrated AWG slots — not a generic adjustable stripper, which nicks strands.
- Heat gun with a reflector nozzle for even shrink distribution (a lighter or torch will scorch the sleeve).
- TONFUL step-down butt connectors in the correct size for your wire combination.
- Multimeter for continuity and resistance verification after crimping.
- Optional: pull-test fixture if you are doing production work to IPC/WHMA-A-620 standards.
Step-by-Step: Connecting Two Dissimilar Sized Wires
Step 1 — Identify the Correct Connector Size
Read the colored stripe on each end of the connector. The stripe matches the industry color code: red for 22–18 AWG, blue for 16–14 AWG, yellow for 12–10 AWG. Match the larger wire to the larger opening and the smaller wire to the smaller opening. If you are unsure which AWG your wire is, check the printing on the insulation or measure the conductor diameter and cross-reference our wire AWG insulation selection guide.
Step 2 — Strip Both Wire Ends
Strip each wire to the length marked on the connector body — typically 6 to 8 mm (about 1/4 inch) for standard sizes. You should see bare, undamaged strands with no nicks. Nicked strands will break under crimp pressure and reduce the effective cross-section, raising resistance. If you are new to this, our guide on how to properly crimp electrical wires covers stripping technique in depth.
Step 3 — Insert the Larger Wire First
Push the stripped larger-gauge conductor fully into the large end of the connector until it bottoms out against the internal stop. The insulation edge of the wire should meet or slightly overlap the mouth of the sleeve. Give the wire a gentle tug — it should not slide back out before crimping.
Step 4 — Crimp the Large End
Place the connector in the matching color die of your ratcheting crimp tool, positioned over the barrel where the large wire sits. Squeeze fully until the ratchet releases. The die should compress the barrel into a controlled hex or oval profile that cold-welds the copper strands to the barrel wall.

Step 5 — Insert and Crimp the Smaller Wire
Repeat the procedure on the small end: insert the stripped smaller-gauge conductor until it bottoms out, then crimp with the same (or next-smaller) die. On most step-down connectors, both ends use the same color die; on some HD variants the two ends require different dies.
Step 6 — Apply Heat to Shrink and Seal
Move the heat gun in a slow, even pass from the center of the connector outward toward each end. The sleeve will shrink tightly around the wire insulation, and the adhesive liner will melt and flow — you will see a small bead of adhesive exit each end of the sleeve. That bead is your visual confirmation that the seal is complete. Stop heating once the sleeve has fully conformed and adhesive has flowed. For more on this step, see how to crimp heat shrink terminals correctly.
Step 7 — Test the Connection
Perform a pull test by hand: a correctly crimped step-down splice should withstand a firm tug (the IPC/WHMA-A-620 standard specifies minimum pull forces by AWG). Then check continuity with a multimeter — resistance should read near zero (under 0.1 Ω). If you are doing production work, follow the pull-force protocol in our crimp pull force testing guide.

Step-Down vs. Standard Butt Connectors vs. Alternatives
| Method | Dissimilar AWG? | Waterproof | Vibration Resistance | Installation Speed | Relative Cost |
|---|---|---|---|---|---|
| TONFUL step-down butt (heat shrink) | Yes — purpose-built | Yes (IP67) | High | Fast | Medium |
| Standard butt splice (nylon) | No — loose on smaller wire | No | Low | Fast | Low |
| Solder + heat shrink | Yes | Yes (if sealed) | Low (cracks under flex) | Slow | Low |
| Split bolt connector | Yes (large gauges) | No (must tape) | Medium | Medium | Medium |
| Wire nut (twist-on) | Limited | No | Low | Fast | Low |
| Solder sleeve butt connector | Some variants | Yes | Medium | Medium | Medium |
The step-down butt connector is the only option that is simultaneously purpose-built for gauge transitions, fast to install, sealed against moisture, and compliant with the mechanical-connection requirement of NEC 110.14. For a deeper comparison of solder vs. crimp reliability, read solder vs. crimp.
Common Mistakes to Avoid
Using the wrong size connector. Forcing a 10 AWG wire into a blue (16–14) step-down or a 14 AWG wire into a yellow (12–10) large end will either leave strands outside the barrel or produce an over-crimped, damaged joint. Always match the stripe color to the wire. Our guide to choosing the right wire connectors walks through selection logic.
Crimping on the insulation instead of the bare conductor. If you insert the wire too far, the crimp die may land partly on the wire insulation, which compresses but does not conduct. The crimp zone must be over the stripped copper only.
Under-heating the sleeve. If the adhesive does not flow and form a bead at each end, the seal is incomplete. In marine and outdoor environments this is the difference between a connection that lasts ten years and one that corrodes in one season — see marine wiring corrosion prevention for the full failure mode.
Using a non-ratcheting tool. Pliers and cheap crimpers apply inconsistent force and cannot guarantee a cold-weld crimp. This is the number one item in our common crimping mistakes list for good reason.

Quality Standards and Compliance
TONFUL step-down butt connectors are manufactured to meet UL 486A-486B (for copper conductor splices) and are RoHS-compliant. The crimped connection satisfies NEC 110.14 requirements for mechanical and electrical integrity without relying on solder. For applications in regulated industries, our CE vs. UL certification guide for electrical terminals explains how these standards differ and what to specify on a purchase order.
For production environments, every lot undergoes pull-force testing and cross-section metallographic inspection — the same protocol described in our tensile test and metallographic analysis of cold-pressed terminals article. If you are sourcing for OEM or distribution volumes, the TONFUL step-down butt connectors manufacturer page details available custom configurations, private-label options, and bulk packaging.
Short FAQ
Can I use a step-down butt connector to step up (connect a small wire to a larger one)? Yes. The connector is bidirectional — what matters is that each wire goes into the end sized for its gauge. The terms “step-down” and “reducing” describe the barrel geometry, not a required direction of current flow.
What is the maximum voltage rating? TONFUL sealed step-down butt connectors are rated to 600 V for building wire and 1000 V for applications at 105°C. This covers virtually all automotive (12 V / 24 V / 48 V), marine, solar, and residential branch-circuit use.
Are these connectors rated for aluminum wire? No. The tin-plated copper barrel is rated for copper conductors only. Joining aluminum to copper requires a connector specifically listed for dissimilar metals, typically with an antioxidant compound.
Do I need to solder the joint after crimping? No. A properly executed crimp forms a gas-tight cold weld that does not require solder. In fact, soldering a crimped joint can make it brittle under vibration. The NEC prohibits solder-only splices for line voltage; crimped connections are fully compliant on their own. See are crimped connections as good as soldered for the full comparison.
Can I reuse a step-down butt connector? No. Once crimped and heat-shrunk, the barrel is permanently deformed and the adhesive has bonded. Removal requires cutting the connector out and starting fresh with a new one.
What size step-down do I need to join 12 AWG to 18 AWG? Use a yellow (12–10 to 16–14) connector if the smaller wire is 16 AWG, or a blue (16–14 to 22–18) connector if the smaller wire is 18 AWG and the larger is 16 AWG. For a 12-to-18 jump, a yellow step-down with the 12 AWG in the large end and the 18 AWG in the small end (rated 16–14) is the closest standard match — but verify the smaller wire seats fully. For combinations outside standard ranges, contact TONFUL about custom wire harness assembly options.
Conclusion
Connecting two dissimilar sized wires is one of the most common — and most commonly botched — tasks in electrical work. A TONFUL step-down butt connector turns a potential failure point into a sealed, code-compliant, vibration-proof joint in under a minute per connection. Match the color stripe to your wire gauges, strip cleanly, crimp with a ratcheting tool on the bare copper, and heat until the adhesive flows. Do those four things and the splice will outlast the wire around it.
To source TONFUL step-down butt connectors in bulk, request samples, or explore custom configurations, visit the TONFUL step-down butt connectors manufacturer page or browse our full terminals and connectors catalog.